Showing posts with label Crafts. Show all posts

Monday, 31 August 2020

Katie's Frozen Birthday Party


I’ve always tended to go overboard when party planning – be it a birthday, wedding, a company Christmas party, any sort of shower – I throw myself into it 100% and try to make it amazing.  That behaviour is the main reason I opted to attend an Event Management Program after finishing University – I figured it was something I loved doing, why not try and make a career out of it. While I haven’t yet made a career out of it – there is still time! – my love of all things event planning has remained.

With COVID being a thing and many things still shut down or not seeming safe, I didn’t have much else to focus on. So that focus went into Katie’s 2nd Birthday planning. Add in my father – who I probably inherited my party planning gene from – and it went to a whole new level. Here are some highlights from her Frozen themed party.


I opted for a backyard BBQ in our outdoor kitchen so we could keep it distanced and spaced out (thankfully the weather cooperated!) and kept the guest list at just family and close friends we have been seeing often. I wish I could have invited a ton more people and all her little friends but again, with COVID it just didn’t seem like a smart idea. I also kept the food simple – hot dogs, hamburgers, salads and pizza from the pizza oven.


When I first decided on the Frozen theme (Katie LOVES all things “Let it Go” as she calls it), I wanted to hang a few snowflakes from the beams in the outdoor kitchen. I was thinking just a few – maybe 15 max. But finding snowflakes in August proved hard. Amazon has a lot – but not a great snowflake selection. All I could find were small paper or foil ones, or really expensive wood ones. This is where my father came in. he recently purchased a laser cutter for work and figured this was an easy project to undertake. We found a variety of snowflake images from Google and bought some large foam board from ULINE. From there he and his friend took over – and used the images to develop a range of snowflake templates for the laser cutter. They made them 3D and in a variety of sizes – they also made me 100 of them! I was pretty speechless when I was given bundles and bundles of snowflakes. The snowflakes were printed on white foam board but some of them had some burning on the edges – a product of the laser – so I opted to glitter-ize them. I used Martha Stewart glitter spray paint on some and I used a combination of glitter spray paint and actual glitter on others. When I ran out of spray paint, I used some Elmers Spray Adhesive with glitter – this method didn’t work as well – it took longer to dry and was really gummy feeling – but it still did the job. This project was a large undertaking – I was outside working on these for 3 afternoons and it involved multiple trips to Michaels for supplies. And afterward the backyard was covered in glitter – the desk, the floor, the garden beds etc due to the wind. Even a week later after multiple rainstorms, it is still pretty sparkly out there! But the finished project was incredible. And the snowflakes can easily be repurposed to Christmas decorations which is another area I tend to go overboard on.


Hanging them was also a process – after multiple trips up and down a ladder, Dad created some contraption with a large stick and thumbtacks to stick them up easier. Even with that hanging these things took about 8 hours over the course of 2 days – and there was 5 of us working on them. They are still hanging there – they look so pretty and were so much work no one is in a rush to take them down. They have held up better then I thought – we have had a few really windy days and some rainstorms and only two have fallen down. Part of me hopes they can just stay up until Christmas. We don’t tend to use the space as much in the fall/winter but maybe this will inspire us to.

Since we had a bunch of foam board left over, we also used the laser cuter to create some images of the Frozen characters. Party City sells these life size cutouts of them, but they are almost $50.00 each, and there are 4 of them. I couldn’t justify spending $200.00 on that, so we printed them instead. They weren’t life size but they worked perfectly. We used photo paper to print the images and mounted them on the foam and boards cut by the laser cutter. Katie was so happy when she saw them – even now, she goes up to them daily to point and smile. I figure I can use them as décor in her room for the time being – and maybe down the line I will sell them. 


I also bought a cool photo backdrop from Party City figuring we could do some photos in front of it. But measurement and math have never been my strong suit, so I didn’t really pay attention to the sizing. It is meant to be taped on a wall so it was much larger then I realized. I was just going to forget about using it but dad had other ideas. Buying a sheet of wood from Home Depot and some wood pieces he created a photo backdrop and adhered the two main images to it. Then we hung some snowflakes from it and glued some cotton to the bottom to look like snow. The finished project was a larger then life backdrop that made for some amazing photos.


One of the things I kept seeing on Pinterst for Frozen themed parties was this really cool Blue Punch – so I wanted to make that. I found a double punch dispenser on clearance and figured I would make two types. There was a reason this thing was on clearance it leaked and barely dispensed anything – but it was pretty and the kids loved it. They had a patience to stand there while it trickled out slowly and had a blast being “fancy” with the plastic champagne flutes I found at Costco. 


Blue “Frozen” Punch:

A bottle of Blue Hawaiian Punch

A bottle of 7 up

1 large can of Pineapple Juice


Raspberry Sparkle Punch

A bottle of 7 up

1.5 Cans of Pink Lemonade

(If serving in a punch bowl – I use fresh raspberries and make an ice ring using a bunt pan and some sliced up lemons and limes)


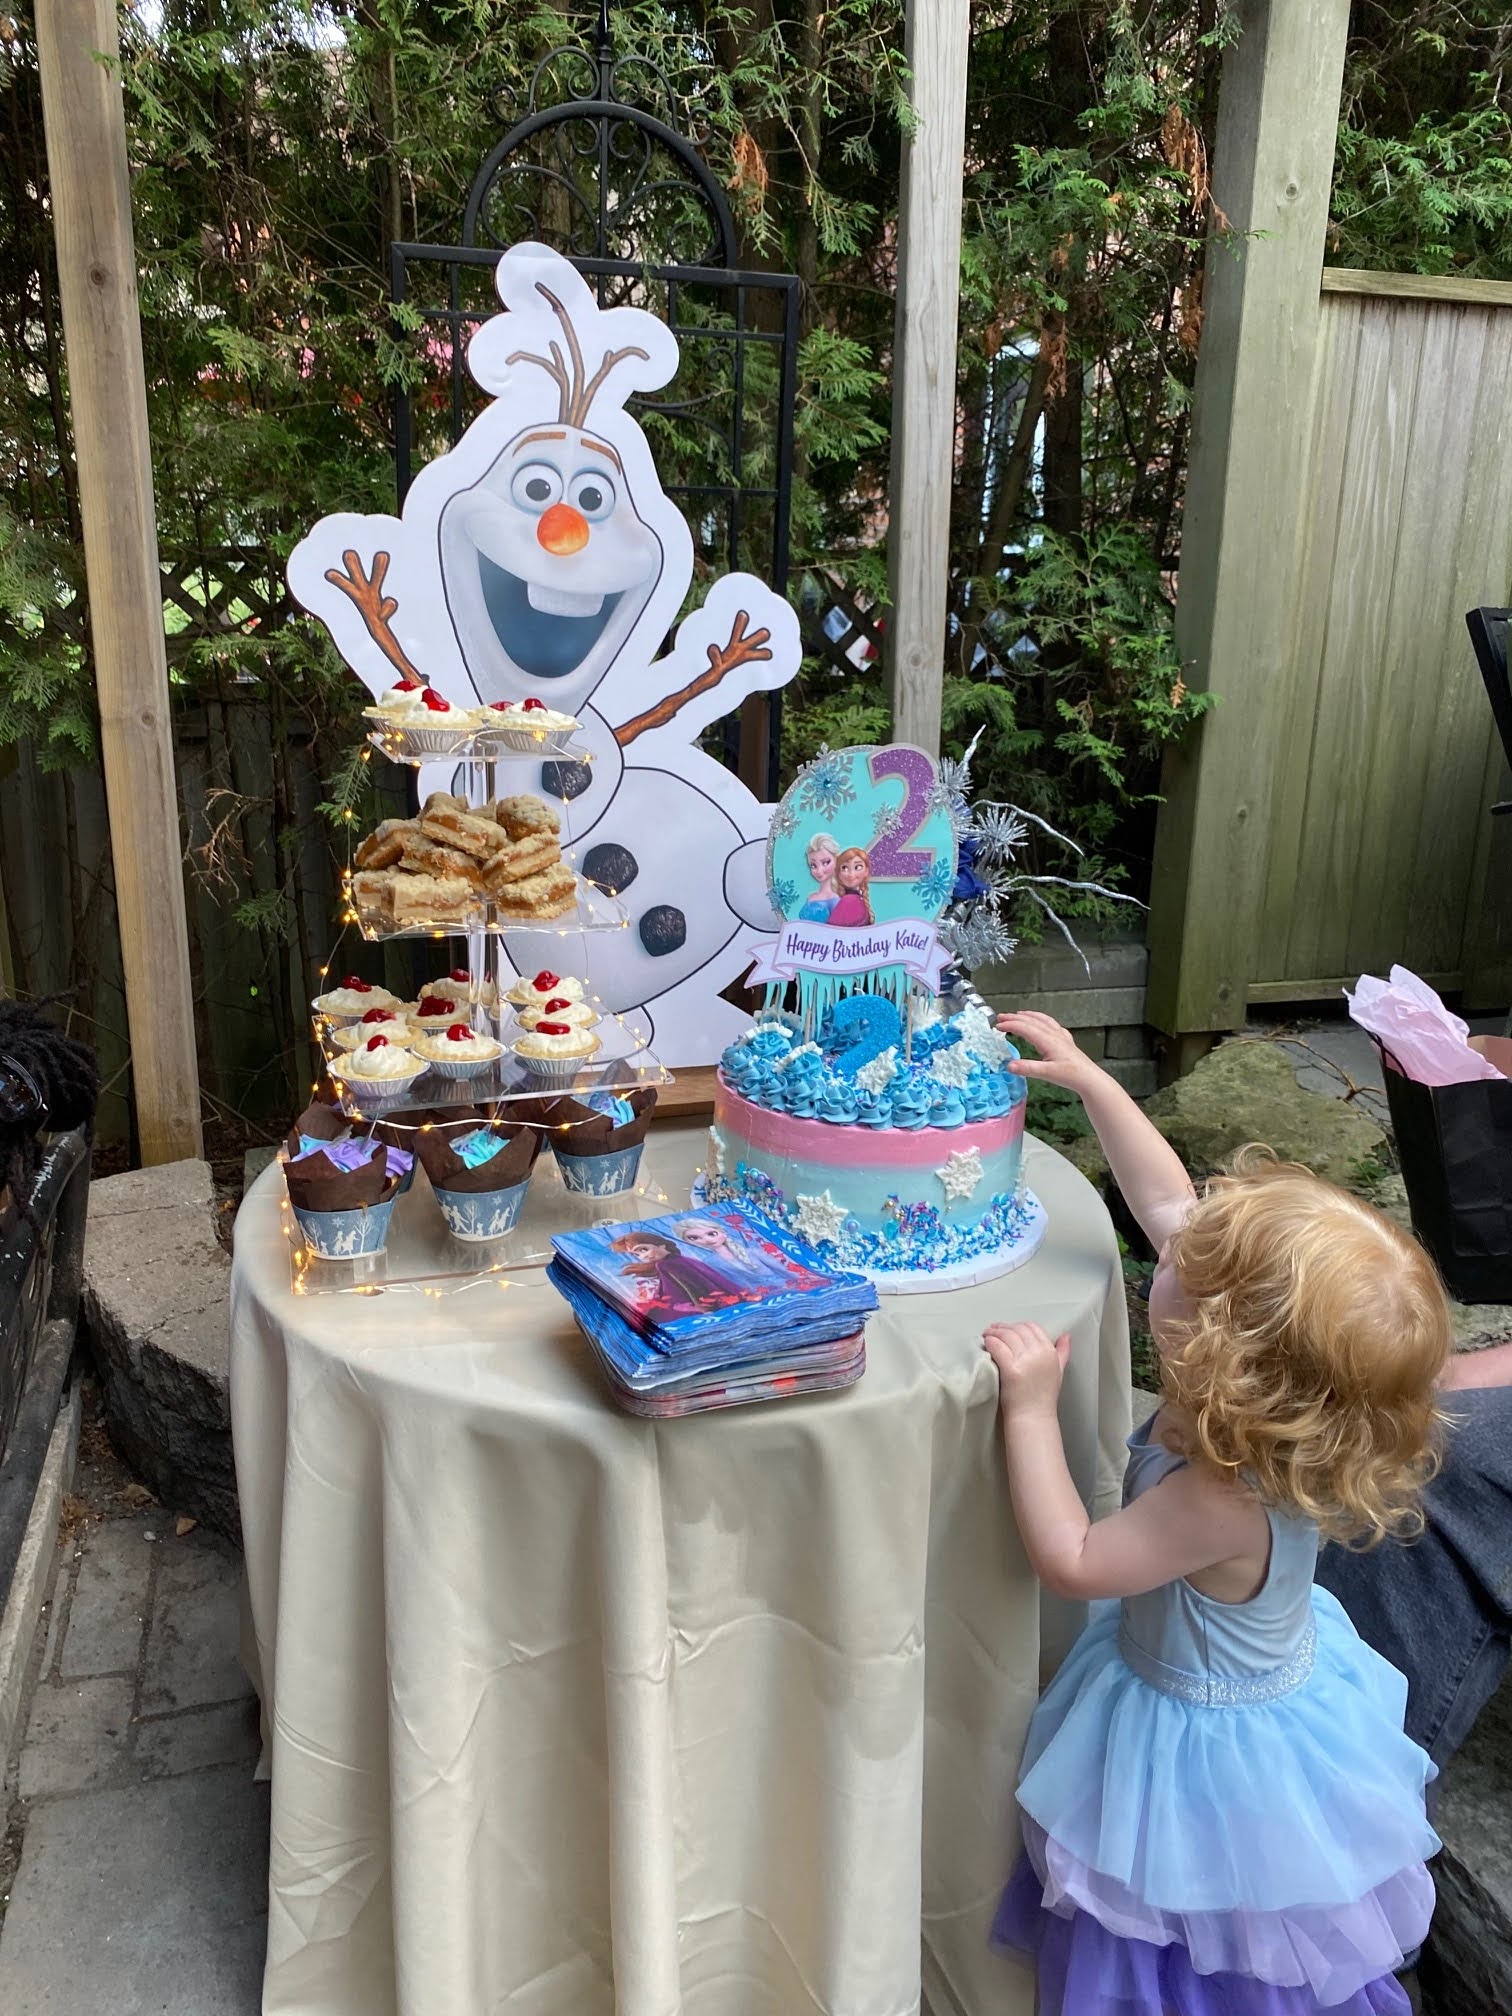
I also went a bit crazy and created a desert table. I knew I wanted to give away some cookie favors – we have this one amazing baker we have used a bunch of times so I asked her to make me a bunch of cookie wands. She made these beautiful snowflake wands and a few ones with “2” on them. They were so pretty I knew I had to display them some way. I thought about doing a few different things with glass jars but I had trouble finding something that could display all 30 of them at once. I didn’t want to have to worry about refilling or having them multiple places. I saw these round foam shapes that are often used to make cake displays and had an idea to make a three-tier version to display the cookies. I covered them in a silver organza that was on clearance and then wrapped the sides in a blue rhinestone fabric – for this I also used the Elmer’s Adhesive. I used cake dowels to elevate them.


I ordered a cake from a local Baker I wanted to try – The Barenaked Baker – whose cakes always looked stunning and delicious. She didn’t disappoint  - the Frozen themed lemon cake was both. Her cake options for flavors and icing spanned 2.5 pages with some interesting options I’ll be sure to try for my next event. But she offers a lot of nut-based options and with three guests having nut allergies I wanted to make sure there was something nut-free. Initially I was going to order a dozen cupcakes from a nut-free bakery but they wanted $42.00 for 12…. To me that was a bit too much. So I made them myself. Google and YouTube helped me find a tutorial for making two toned icing – it was much easier then I thought! Basically its three piping bags – a large one and two smaller ones. You fill the small ones with the icing colors you want and then put them both inside the lager one. Voilà – a two-tone swirl! I used a frozen cupcake set I got from Party City to decorate along with some small snowflake rings I found on Amazon. My friend who is an amazing crafter made me a stunning cake topper which just completed the overall look matching the cake to the cupcakes.


A friend of mine was bringing her new boyfriend who does Photography on the side and he generously offered to take some photos for me. He had tried a batch of Salted Caramel squares I made a few weeks back and had loved them, so I figured I would make a few batches to also have at the party. I topped them with some frozen themed sprinkles I found at Walmart which worked into my theme. My sister-in-law also made some of my favourite Party Tarts – so there was a large amount of desert options. I found a four tier serving tray on Amazon that lights up and that made the perfect backdrop to display all the delicious treats. I also bought some boxes so I could package up extra treats to send home as additional favours. 


One of the things I found on Pinterest for Frozen themed parties was fake snow stations that kids could play in. I didn’t have enough kids to create a whole baby pool of snow (that would have been cool if I had) but I figured I would make some as decoration. I found fake snow on Amazon – it was supposed to make 10 gallons of snow – and maybe it did but it didn’t feel like a lot. It added a nice touch and was easy to make/clean up. Plus the kids loved it – they were throwing it at each other which was pretty cute.


For the entrance to the outdoor kitchen I wanted to do something pretty so I found some sheer blue curtains at Home Depot and two strands of curtain lights. I hung them at the entrance way and it made a very regal feel combined with the overall visual of the snowflakes, snow topped trees and mantle decorated with the character cutouts.  I did buy a cheap fog machine but that ended up being a bit of a mistake as the space was too small and everyone felt like it was suffocating them so it was quickly turned off! But I can use it for Halloween so it wasn’t a total waste.


I also made centerpieces, which ended up being a bigger and more expensive project, then I anticipated. I got some large mason jars which I spray painted in varying shades of Blue and then topped them with glitter spray paint. I put some battery operated twinkle tights inside them, and found a bunch of blue/silver fake floral/wreath making supplies from Michaels. Even with a Buy 1/Get 1 sale on all the floral stuff it was costly. I justified it to myself that these are all easily reusable/transferable to Christmas décor – truthfully I probably overused that justification for this party.  


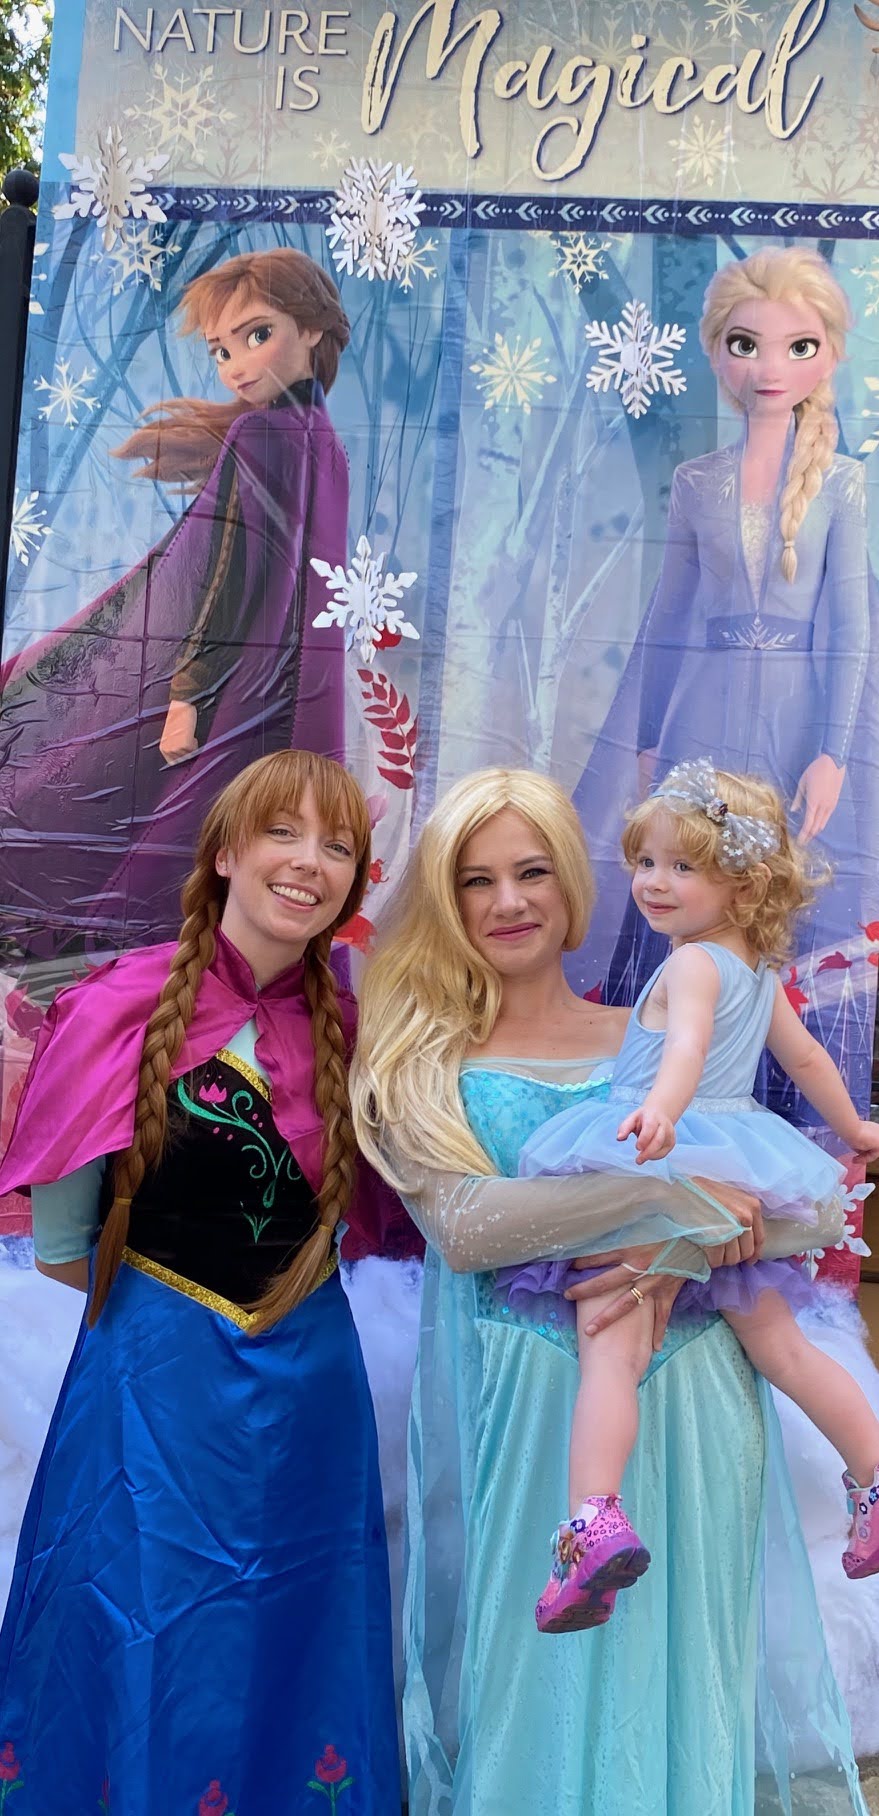
One thing I really wanted was a Princess visit for Katie. She’s at the perfect age for it and I knew the kids would enjoy it. But Brian was opposed due to COVID – which I understood. So I opted to enlist my sister-in-law and friend as Elsa and Anna. I found costumes and wigs on Amazon, so it worked out well – and they have Halloween options. Katie absolutely adored this! I wish I had a photo or video of her reaction, but she was thrilled. She had no idea it was her aunt/mommy’s friend – to her it was the princesses at her party. Liam didn’t even realize it either – and is still talking about how Elsa and Anna came to Katie’s Birthday.


A lot of my party supplies came from Party City – the usual plates, napkins, glassware – and a lot of the décor items came from Amazon. I also used Open A Party for the first time – and I will definitely be using them again! 

They have an amazing selection – more then Party City – they are reasonably priced and have personalization options. Plus their shipping was super fast. I got a cool personalized garden sign for outside along with these cool water bottle labels.


The party was wonderful – the décor, the food, the guests – it was a party to remember. Everyone had a great time and most importantly Katie just adored all the Frozen elements. She’s been in a shy stage lately – likely due to her age and COVID keeping use kind of isolated from people – but she wasn’t at her party. She had such an amazing time; it made all the hard work worth it. Now to start thinking about her 3rd birthday next year!


Monday, 22 December 2014

All Things Christmas [Part Two – Baking and Crafts]

Baking

I love baking and each season provides me a great excuse to try out some new recipes. Pinterest is the number one cause of this as I spend most of the year pining some yummy looking treats I can’t wait to try. Last season’s hit was my Browned Butter Nutella Stuffed Salted Chocolate Chip Cookies… which I of course made again.


Recipe: 

This year’s popular cookie were my adorable Snowman Cookies from Taste of Home http://www.tasteofhome.com/recipes/snowman-cookies.


These cookies not only looked awesome but they were delicious and held up despite their delicate construction. Usually when I try out a new recipe I give myself a few attempts to master it, but this one turned out perfectly the first time. I was a little worried at first about forming the balls and ensuring they stuck together during baking, but I found as long as I pushed them together firmly it worked out well. 

Tips/Hints:

1. The mini-chcolate chips for the eyes have to be pushed on as soon as they are out of the oven to ensure they stick, but if you hesitate at all the chocolate starts to melt a little (ex - Snowman #3). 

2. Instead of the mini-kisses I used regular ones which worked out okay. But next time I would be more careful with the icing when applying their hats (Ex - Snowman #5). 

3. I found that rolling out a bunch of each sized balls first and then assembling them later helped. When I tried to roll in order it took more time and the snowman were all different sizes. 

Step 1 - Forming the Snowman -- push the balls together firmly


Step Two - One baked add their eyes and buttons


Step Three - Decorate when cooled and enjoy!
I made a batch of my favorite Ginger Molasses cookies (a recipe I got from a café I used to work at) and as usual they were good, but not as good as the originals! I also tried out some new recipes like cherry almond shortbread and eggnog cookies. Both recipes were okay, but I plan to improve on them next year. 

I was going to organize a cookie swap this year but started the planning too late. It's definitely on the list for next year though, as I really miss our annual cookie exchange party. I did help out a friend who signed up for a swap not fully understanding the concept and made 160 cookies for her. Brian and my mom thought I was insane but I truly did enjoy it. I love baking and don't find it a chore but a pleasure. 

Usually I take some Holiday cupcake/cake decorating classes at Christmas and spend some time making various cakes and such, but this year I didn't. I only made one batch of cupcakes and kept them simple - I used a plain chocolate frosting and cut out mini fondant ginger bread men which I decorated using edible markers. In the spirit of being honest I will fully admit the cake was from a mix and the frosting from a can. Still, while they were simple and easy they looked great and tasted awesome. I am big on adding liquor and flavours to my cupcakes so in future I would try out this same look but add some gingerbread liqueur to the batter and icing for a more festive feel.  


After I finished all my holiday baking I assembled some cookie boxes which I gave out to various family, friends and co-workers. I find these boxes are great to have on hand for when guests drop by or when you are going to someones house. Because I start my baking early, I make sure that all my recipes freeze well. I carefully seal them in freezer bags which I place inside plastic containers. 

I get all my boxes from either Creative Bag or the dollar store and line them with foil wrap. Then once the baking is finished I assemble the boxes. I leave this until the last week of Christmas so that I can start giving them out immediately. I work quickly at assembling the boxes so that I can refreeze them if needed. If I am refreezing them I wrap them in plastic wrap and foil to keep them from going airy.  


This year I made up a few different sized boxes 

Pecan-Pretzel-Rolo Cookie 

One of the most simple cookies I include in the boxes is a Pretzel topped with a rolo chocolate. This gets baked for about 5 minutes at 350 (you have to watch them) until the chocolate starts to melt. Once they come out of the oven you press a pecan on top forcing the chocolate to cover the insides of the pretzel. Next year I plan to get a little more fancy with the pecans and roast/flavor them beforehand.


Crafts 


I tried out a Christmas craft from Pinterest this year, which turned out quite nicely. I encountered a bit of problems with the vase – the candy canes kept breaking – but when I added some pretty flowers and some bright ribbon, I was happy with the end result. It was a great centerpiece for the table.


My Candy Cane Vase 
Basically you take some sort of round can/vase. A coffee can was suggested but I had a leftover glass vase from my wedding. Then using candy canes you glue them around the sides creating what is supposed to look like this:

Pinterest's Vase - the inspiration 
After about 20 minutes of candy canes breaking and not lining up properly, any  expectations of this being the end result were gone! Still I kept at it making the best of what I had. I finally broke off all the curves of the canes because there was no way I had enough of them and then used a second piece of ribbon to cover any cracks. While it didn't turn out exactly as I had envisioned I think my vase was beautiful and worth the effort! Next year I may try this again but use a square shape instead and make sure I buy a lot more candy canes. 

I also made up some baskets for my fathers business clients. While he usually sends out around 20 baskets, I only did the two large ones as a trail run. They turned out great and we have plans for me to make all of them next Christmas. I used a large box as the base (I find baskets over-used and restrictive) and filled them with various chocolates, cookies, candies and other edible products. I bought the contents at Purdy's chocolates (the best Canadian chocolate store in my opinion!) a local Italian grocer as well as from the One of a Kind Show. I find that many gift baskets come off looking full but aren't really - its an illusion from all the filler inside. I did away with all of that and used only the actual contents inside. 

I have to say the One of a Kind Show was wroth the trip downtown. The different types of candies and cookies I was able to find for the baskets were awesome! They included products from all over Canada and helped make them very unique. 


One last thing I decided to try this Christmas was a holiday-themed manicure! I oped to do a simple candy cane design which turned out nicely. I loved the bit of whimsy/sparkle this added and it perfectly matched my Christmas phone case. (Yes, I actually have a Christmas phone-case which works great with my Christmas ring-tones!).