
I’ve always tended to go overboard when party planning – be it a birthday, wedding, a company Christmas party, any sort of shower – I throw myself into it 100% and try to make it amazing. That behaviour is the main reason I opted to attend an Event Management Program after finishing University – I figured it was something I loved doing, why not try and make a career out of it. While I haven’t yet made a career out of it – there is still time! – my love of all things event planning has remained.
With COVID being a thing and many things
still shut down or not seeming safe, I didn’t have much else to focus on. So
that focus went into Katie’s 2nd Birthday planning. Add in my father
– who I probably inherited my party planning gene from – and it went to a whole
new level. Here are some highlights from her Frozen themed party.
I opted for a backyard BBQ in our outdoor
kitchen so we could keep it distanced and spaced out (thankfully the weather
cooperated!) and kept the guest list at just family and close friends we have
been seeing often. I wish I could have invited a ton more people and all her
little friends but again, with COVID it just didn’t seem like a smart idea. I
also kept the food simple – hot dogs, hamburgers, salads and pizza from the
pizza oven.
When I first decided on the Frozen theme
(Katie LOVES all things “Let it Go” as she calls it), I wanted to hang a few
snowflakes from the beams in the outdoor kitchen. I was thinking just a few –
maybe 15 max. But finding snowflakes in August proved hard. Amazon has a lot –
but not a great snowflake selection. All I could find were small paper or foil
ones, or really expensive wood ones. This is where my father came in. he
recently purchased a laser cutter for work and figured this was an easy project
to undertake. We found a variety of snowflake images from Google and bought
some large foam board from ULINE. From there he and his friend took over – and
used the images to develop a range of snowflake templates for the laser cutter.
They made them 3D and in a variety of sizes – they also made me 100 of them! I
was pretty speechless when I was given bundles and bundles of snowflakes. The
snowflakes were printed on white foam board but some of them had some burning
on the edges – a product of the laser – so I opted to glitter-ize them. I used
Martha Stewart glitter spray paint on some and I used a combination of glitter
spray paint and actual glitter on others. When I ran out of spray paint, I used
some Elmers Spray Adhesive with glitter – this method didn’t work as well – it
took longer to dry and was really gummy feeling – but it still did the job.
This project was a large undertaking – I was outside working on these for 3
afternoons and it involved multiple trips to Michaels for supplies. And
afterward the backyard was covered in glitter – the desk, the floor, the garden
beds etc due to the wind. Even a week later after multiple rainstorms, it is
still pretty sparkly out there! But the finished project was incredible. And
the snowflakes can easily be repurposed to Christmas decorations which is another
area I tend to go overboard on.

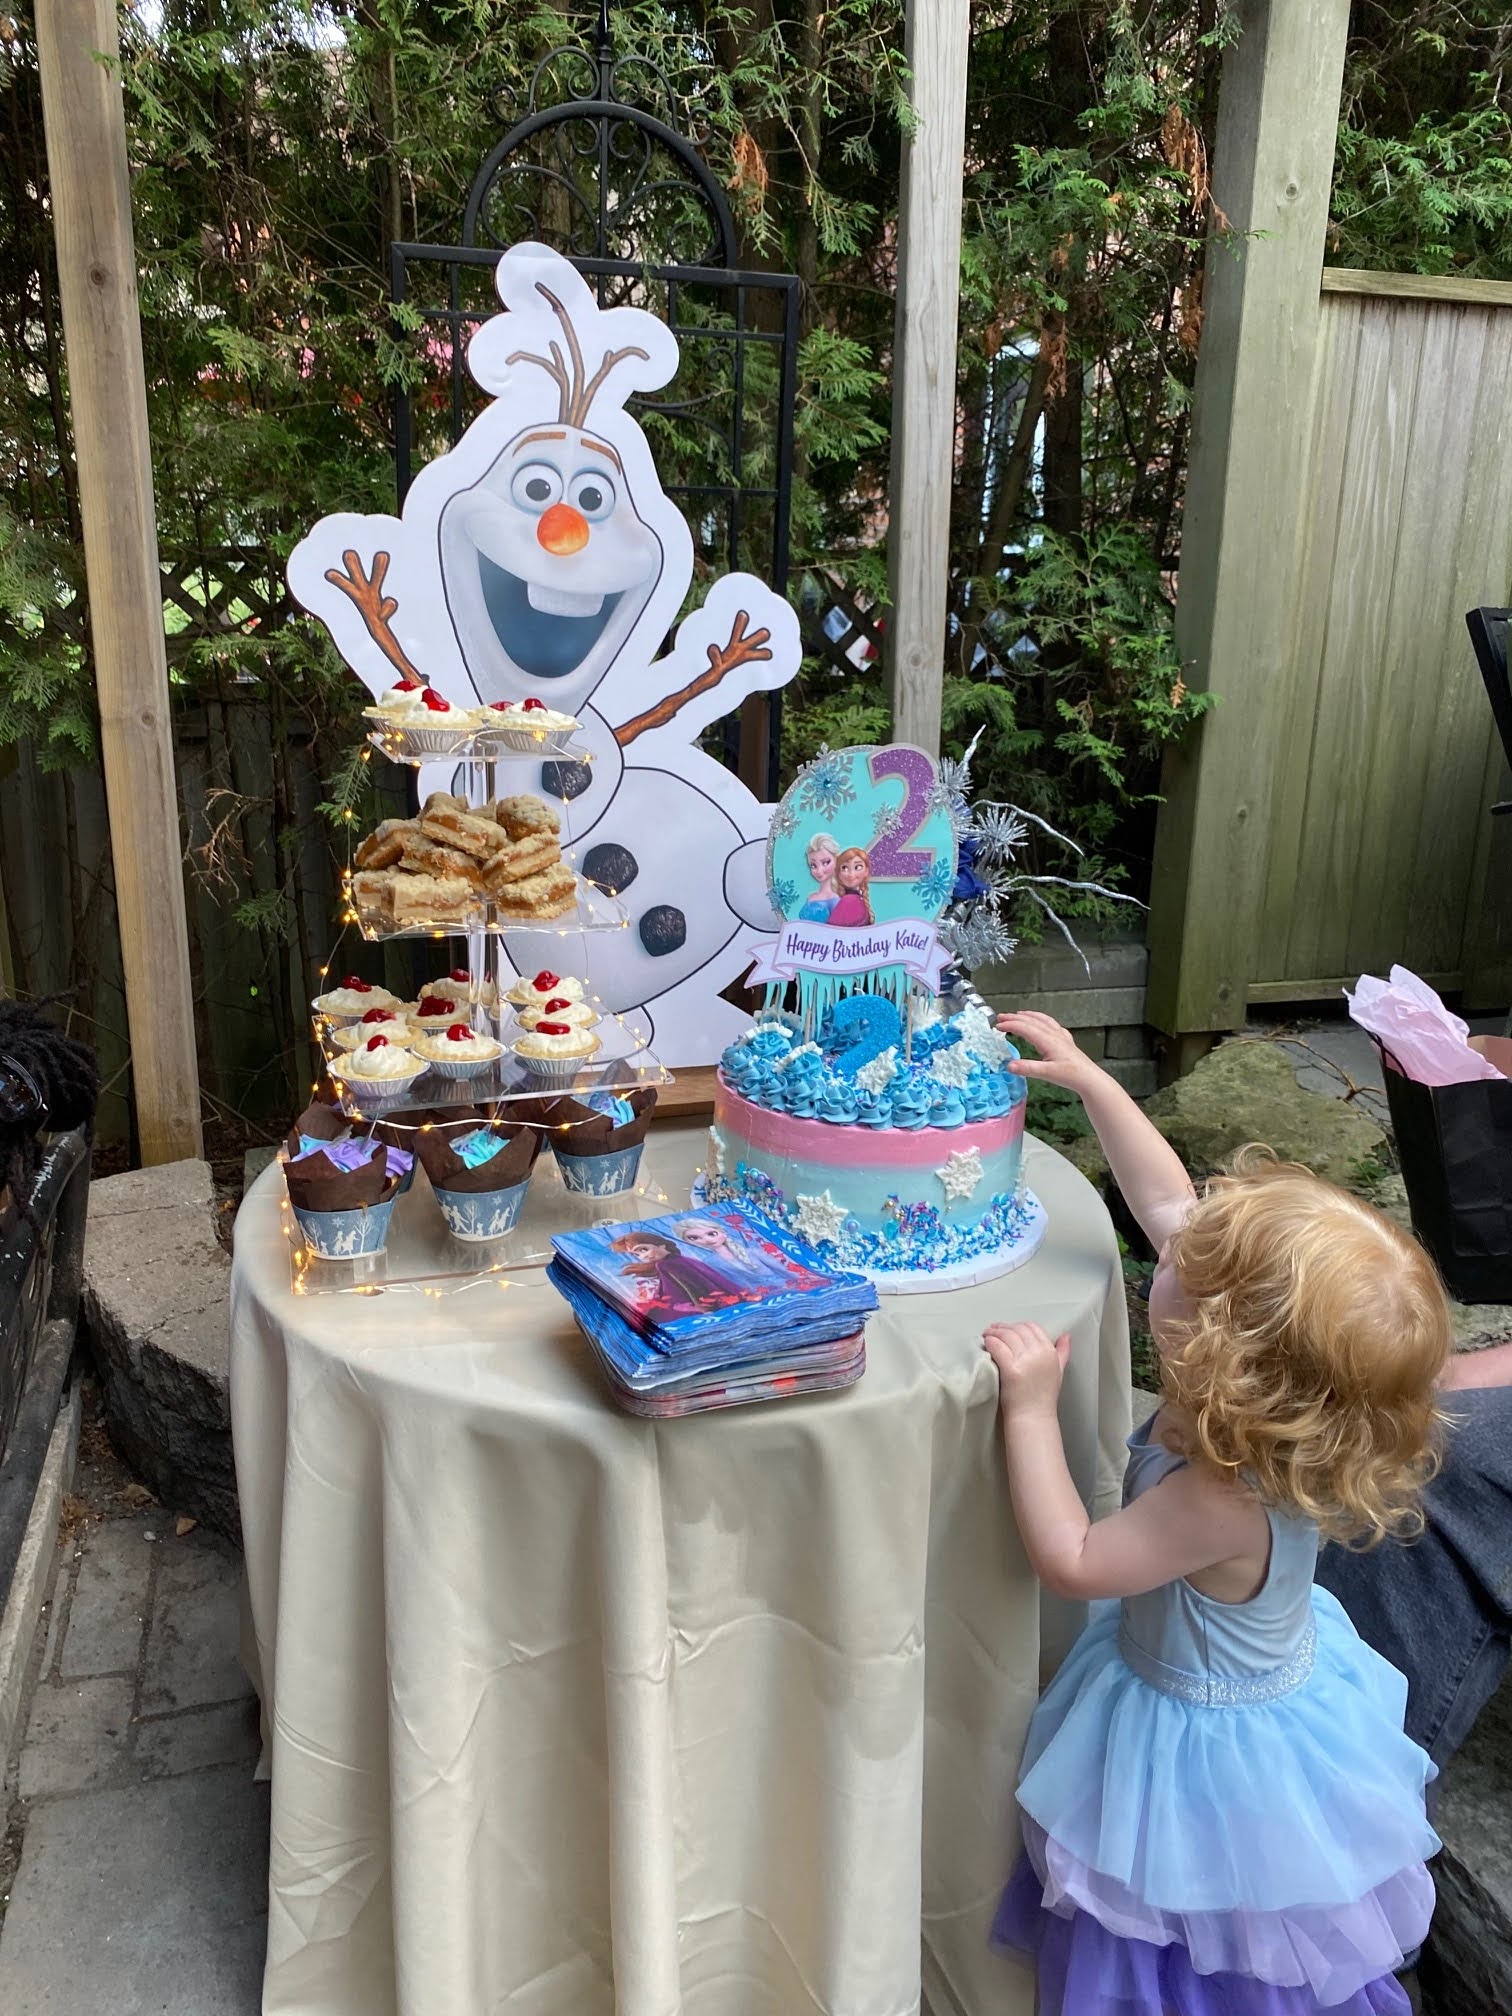
Since we had a bunch of foam board left over, we also used the laser cuter to create some images of the Frozen characters. Party City sells these life size cutouts of them, but they are almost $50.00 each, and there are 4 of them. I couldn’t justify spending $200.00 on that, so we printed them instead. They weren’t life size but they worked perfectly. We used photo paper to print the images and mounted them on the foam and boards cut by the laser cutter. Katie was so happy when she saw them – even now, she goes up to them daily to point and smile. I figure I can use them as décor in her room for the time being – and maybe down the line I will sell them.

I also bought a cool photo backdrop from Party City figuring we could do some photos in front of it. But measurement and math have never been my strong suit, so I didn’t really pay attention to the sizing. It is meant to be taped on a wall so it was much larger then I realized. I was just going to forget about using it but dad had other ideas. Buying a sheet of wood from Home Depot and some wood pieces he created a photo backdrop and adhered the two main images to it. Then we hung some snowflakes from it and glued some cotton to the bottom to look like snow. The finished project was a larger then life backdrop that made for some amazing photos.

Blue “Frozen” Punch:
A bottle of Blue Hawaiian Punch
A bottle of 7 up
1 large can of Pineapple Juice
Raspberry Sparkle Punch
A bottle of 7 up
1.5 Cans of Pink Lemonade
(If serving in a punch bowl – I use fresh
raspberries and make an ice ring using a bunt pan and some sliced up lemons and
limes)
I also went a bit crazy and created a desert table. I knew I wanted to give away some cookie favors – we have this one amazing baker we have used a bunch of times so I asked her to make me a bunch of cookie wands. She made these beautiful snowflake wands and a few ones with “2” on them. They were so pretty I knew I had to display them some way. I thought about doing a few different things with glass jars but I had trouble finding something that could display all 30 of them at once. I didn’t want to have to worry about refilling or having them multiple places. I saw these round foam shapes that are often used to make cake displays and had an idea to make a three-tier version to display the cookies. I covered them in a silver organza that was on clearance and then wrapped the sides in a blue rhinestone fabric – for this I also used the Elmer’s Adhesive. I used cake dowels to elevate them.


A friend of mine was bringing her new boyfriend who does Photography on the side and he generously offered to take some photos for me. He had tried a batch of Salted Caramel squares I made a few weeks back and had loved them, so I figured I would make a few batches to also have at the party. I topped them with some frozen themed sprinkles I found at Walmart which worked into my theme. My sister-in-law also made some of my favourite Party Tarts – so there was a large amount of desert options. I found a four tier serving tray on Amazon that lights up and that made the perfect backdrop to display all the delicious treats. I also bought some boxes so I could package up extra treats to send home as additional favours.

One of the things I found on Pinterest for
Frozen themed parties was fake snow stations that kids could play in. I didn’t
have enough kids to create a whole baby pool of snow (that would have been cool
if I had) but I figured I would make some as decoration. I found fake snow on
Amazon – it was supposed to make 10 gallons of snow – and maybe it did but it
didn’t feel like a lot. It added a nice touch and was easy to make/clean up.
Plus the kids loved it – they were throwing it at each other which was pretty
cute.
For the entrance to the outdoor kitchen I
wanted to do something pretty so I found some sheer blue curtains at Home Depot
and two strands of curtain lights. I hung them at the entrance way and it made
a very regal feel combined with the overall visual of the snowflakes, snow
topped trees and mantle decorated with the character cutouts. I did buy a cheap fog machine but that ended
up being a bit of a mistake as the space was too small and everyone felt like
it was suffocating them so it was quickly turned off! But I can use it for
Halloween so it wasn’t a total waste.
I also made centerpieces, which ended up being a bigger and more expensive project, then I anticipated. I got some large mason jars which I spray painted in varying shades of Blue and then topped them with glitter spray paint. I put some battery operated twinkle tights inside them, and found a bunch of blue/silver fake floral/wreath making supplies from Michaels. Even with a Buy 1/Get 1 sale on all the floral stuff it was costly. I justified it to myself that these are all easily reusable/transferable to Christmas décor – truthfully I probably overused that justification for this party.

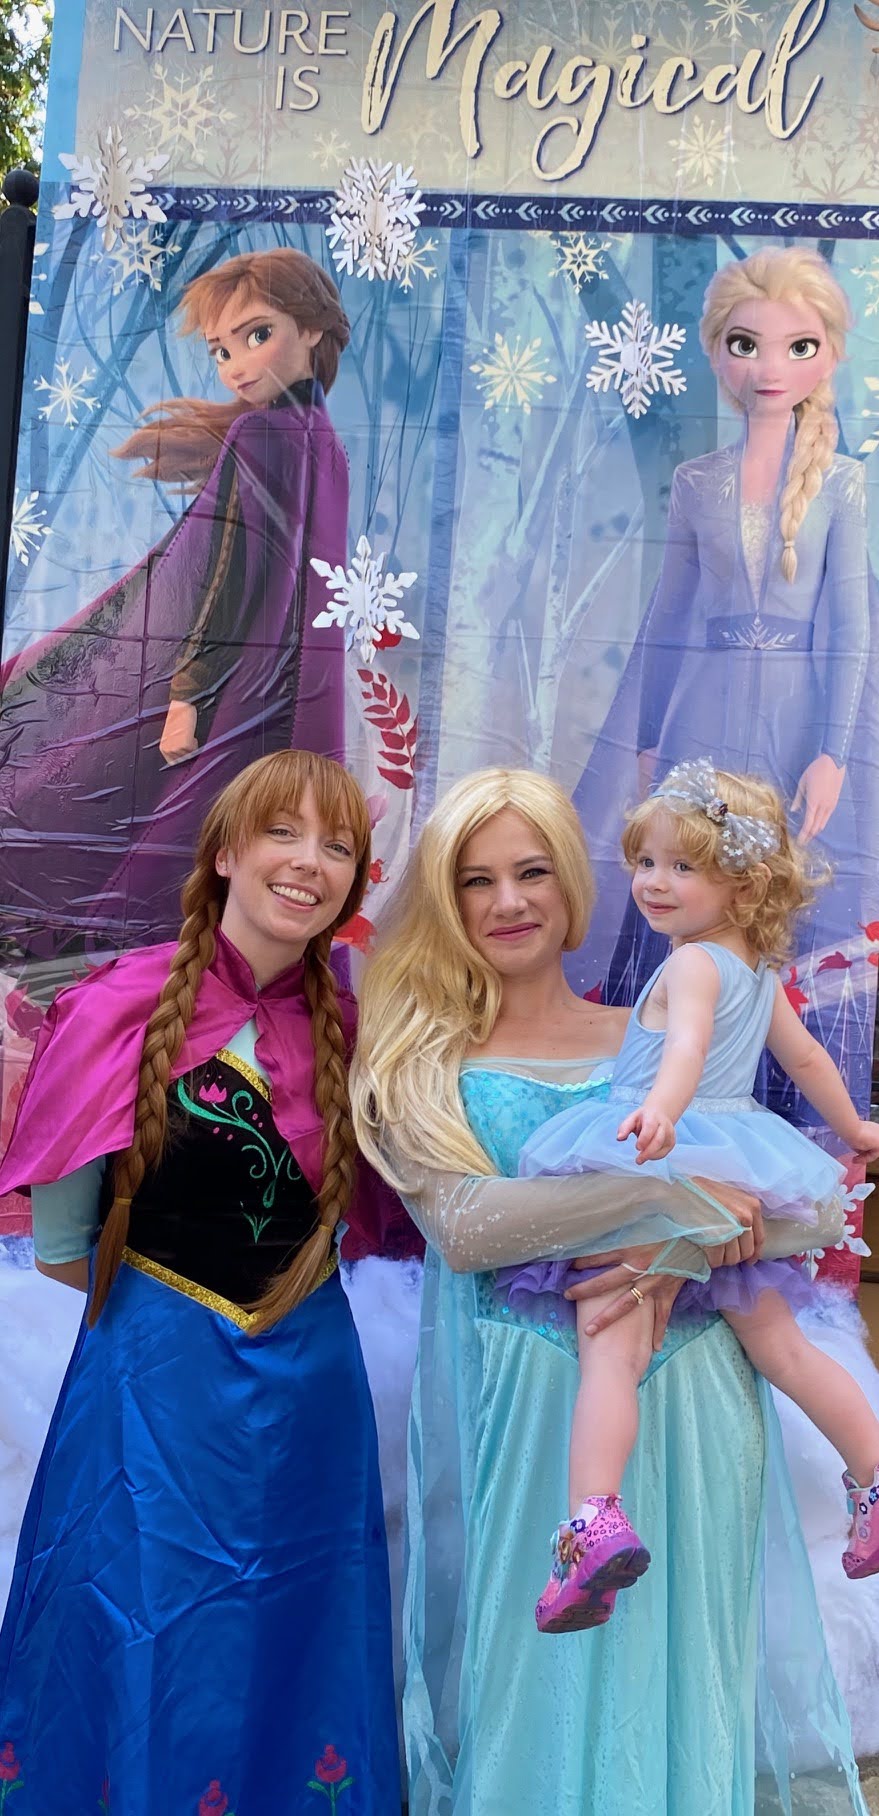
One thing I really wanted was a Princess visit for Katie. She’s at the perfect age for it and I knew the kids would enjoy it. But Brian was opposed due to COVID – which I understood. So I opted to enlist my sister-in-law and friend as Elsa and Anna. I found costumes and wigs on Amazon, so it worked out well – and they have Halloween options. Katie absolutely adored this! I wish I had a photo or video of her reaction, but she was thrilled. She had no idea it was her aunt/mommy’s friend – to her it was the princesses at her party. Liam didn’t even realize it either – and is still talking about how Elsa and Anna came to Katie’s Birthday.


The party was wonderful – the décor, the food, the guests – it was a party to remember. Everyone had a great time and most importantly Katie just adored all the Frozen elements. She’s been in a shy stage lately – likely due to her age and COVID keeping use kind of isolated from people – but she wasn’t at her party. She had such an amazing time; it made all the hard work worth it. Now to start thinking about her 3rd birthday next year!


No comments:
Post a Comment